In this Tutorial I will explain you the basics, how to install and set up a Teamspeak 3 Server on Windows.
Some Images are from a German Version but the Text on the Images aren´t much different to English and anyway I will explain each Steps via Text. So you wont have much Trouble to understand.
First we will need to download the TS 3 Server Software here. Be sure that you download the Server and not the Client Tool. Be also sure that you choose the right Version for your OS.
When the Download is finished you can unpack the File to any Place you want it to be.
When done.. just start the Tool with “ts3server_win64.exe”.
We will now see a new Window pop up:
 Dont close this Window as it simply tells us that the Server is started.
What we do next is starting our Teamspeak Client Tool and go to “Connections” and then “Connect” (Strg + S):
 After we did that.. we get the Connection Window:
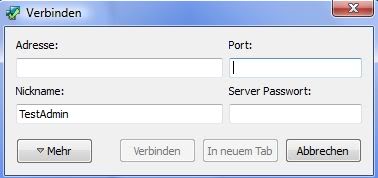 As Adress we should fill in our Locale IP Adress. If you are not sure how to find out your IP Adress. I do explain it in short…
In Windows click on start and in the Search Box type in “cmd”. This will open the Command Prompt. And there you need to type in “ipconfig” which then will list your IP Adress and different other Data.
Back to our TS 3 Client…
We can put it in the Adress Section of our TS 3 Connection Window now as I said. Then we need to type in the TS 3 Standard Port which is “9987”.
Indeed you can choose your Nickname to whatever you like it to be. We let the Server Password empty for now.
At least just click “Connect”.
 We should be on our own Teamspeak 3 Server now. But we still must give our self Adminrights.
In our TS3 Server Client we click on “Rights” and then on “Use Token”.
 In the following Window then, we must enter a “Key”.. a so-called “Token”.
 This Token was generated first when we started the Server. So we will find this Key in our TS 3 Server Folder and there in a Folder called “Logs”. We open the File in this Folder with a Texteditor and then we search for the Entry “ServerAdmin token created, please use the line below”. Because under this Line we will find the Key we need.

Back to the Teamspeak 3 Client we enter this Key in the Window now.
 Once done, we just hit “OK” and if we now go back to the Channelview we see on the right Side of our Name the Symbol or Letter “S” which tells us that we own Serverrights now.
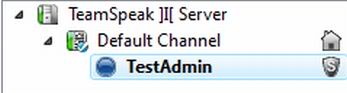 We can now organize the Server, set up Channels and what ever we like.
This was about the basic installation of a Teamspeak 3 Server on Windows. Excuse me for the Images with German Language. This Tutorial was first written for one of my German Web Projects. But I guess there was not much different Text in the Images and my Explanation maybe helped so that you didn´t have much Problems to follow these Steps. At least I hope.

