Some of you might know that I’ve been playing Cities: Skylines once in a while. I like city building games but there is something that annoyed me a lot. The standard maps the game comes with. So, at some point, I discovered the Steam Workshop where users can upload their own maps as the game has a map editor. On that way, I found maps that I enjoyed. But there was still something that I couldn’t get out of my mind. I always wanted to play on the landscape of the city where I live, it’s Lübeck. I’ve seen that a few users (probably living here too) created such a map already but I tested them and I didn’t like the quality. What I was looking for was a one-to-one rendition of our city and there was only one way to get it, it would be to do it myself. In this post, I want to show you my work in progress map but I also will talk about some methods that might help or inspire other map editors in Cities Skylines.
So, this month I started to work on it and my experience with different tools, especially graphic applications was beneficial. Also, the fact that it wasn’t the first time I created modifications for a game. It was also helpful that the community already created some tools, such as Terrain Party, which is using the Open Street Maps API. This website allows you to move a square on the Open Street Map and download an 18 square kilometer big heightmaps from that position. This is almost one-to-one but people discovered that Cities Skylines has 17.28 square kilometers. That means, the first thing I had to do was to increase the 1081×1081 heightmap by 4% in Photoshop, which would result in an image with the size of 1124×1124 pixels. But to get to the right scaling, I now had to change the canvas size to 96% (cutting the edges by 4%). This would result in a much more accurate scaling with the heightmap and the games engine.
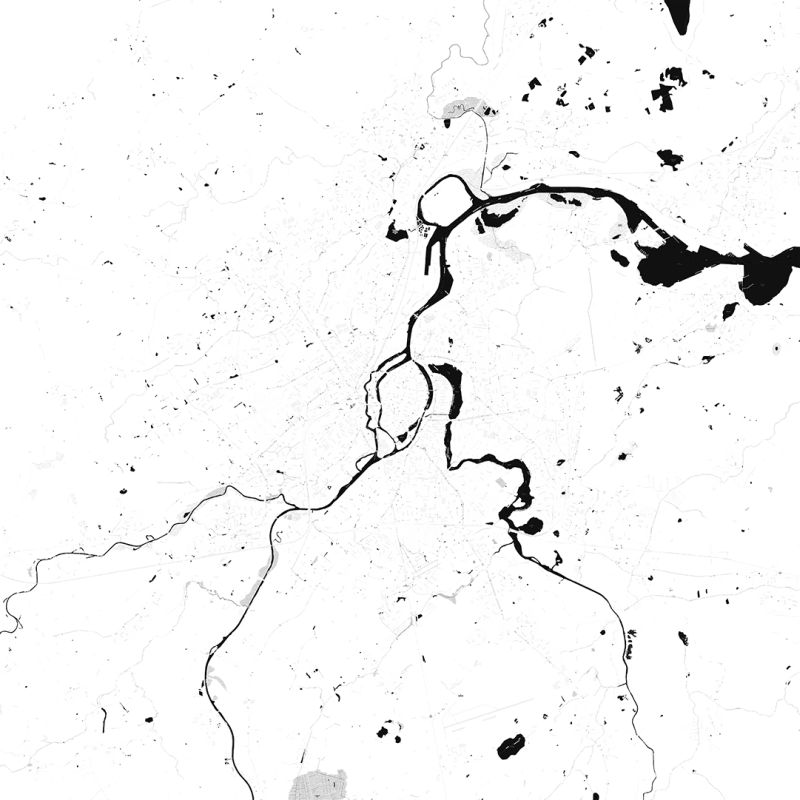
But there was still a problem. For Europe, you can only get heightmaps for free with a resolution of 30 meters. The authorities want you to pay a lot of money if you need 10- or 5-meter resolution, so you can not get these resolutions, at least not if you are working on a German landscape. How did that affect me? Well, the heightmap with 30 meters resolution absolutely didn’t display the rivers accurately. At this point, I thought there is no way I can continue with the project. But as a photographer, I got an idea, a really interesting idea. The heightmap folder came with a text file where I saw the exact coordinates of the square I downloaded. What if I would download the exact map from Open Street Map and extract the rivers myself, to maybe later blend them into the heightmap? As a photographer, I often convert images to black and white and I realized if I would do the same with the map image, I’d get nice contrasts between land and water bodies on the map. But for now, I just had different heightmaps that all didn’t accurately showed the rivers, especially not when imported to the game engine (they’ve been much darker but for the demonstration on my blog and better visibility I increased the gamma value)…
")
")
")
")
Meanwhile, although a different problem, I wondered if there would be a mod that would allow me to display a map as an overlay in the games map editor and I found the OverLayer mod. Because in case I need to do any hand painting on the game’s map, I’d really need an overlay on top with an Open Street Map image. With that in my mind, I realized that I’d need a huge high-quality map file. Do you remember how detailed Google Maps or Open Street View is if you scroll deeply into the map? How would you get that level of detail as a screenshot if we speak about 18.28 square kilometers? If you scroll out of those maps, you can’t see all those fine details. So, I wondered if I need to take tons of screenshots and stitch them all together in Photoshop. I am glad that I am lazy because just the thought about this gave me anxiety. So, I preferred to do my research and found a tool called Multi Map Downloader. It’s doing exactly that, you define the coordinates of your grid (which I find in a text file of the heightmap folder I downloaded) and the zoom or detail level you want. I ended up downloading a massive map image of 13056×13056 pixels, it was whooping 141 Mb big. imagine that.
Remember, to get to the scale of the game, I had to increase the resolution of that file by 4% as well and cut edges by 4% again, otherwise, it would be a different scale than the heightmap. I tested the overlay mod in the game and loaded the file and was amazed. I now was able to show and hide the actual Open Street Map images with massive detail in the map editor. This would help me a lot because I could then accurately paint trees on the ground where they belong, like the forests in my city. Same for drawing fields, the original highways and original rail network of our city. And as I mentioned previously, I now also had a massive map image where I could attempt to extract the rivers from the map, to improve my heightmap where the rivers of around the city haven’t been accurately shown. So, I loaded that exact same file also in Photoshop and this is where it was pretty beneficial to be a photographer.
As said, I wanted to convert the Open Street Map image to black and white. But there is another trick to it. If you want to convert to black in white in Photoshop, you have the option to change the color values. And the Open Street Map doesn’t exactly have many colors. The land is green, water is blue, the highways are red and so on. Guess what happens if I tell Photoshop to set the reds to -200%? Right, all the highways will turn black. So, I did the same with all colors except cyans and blues, I raised the colors by 300% and it made the rivers turn completely white. But that’s not enough, you need to open the brightness and contrast settings and lower the brightness as much as you can and increase the contrast to maximum. The river stays white but everything else on the map turns even darker. But this is still not enough. With Photoshop you can also change the levels and here is where the magic happens. I moved the shadows slider heavily and now everything except the rivers was pitch black. Mission done, the rivers are extracted from the Open Street Map image. If you would do this to your photos, you’d basically destroy them but here, in this case, it’s a perfectly fine method (lol). Here is how the image with the extracted river looked like…
So, if you want to create the landscape of any European place but you have the exact same problem with the heightmaps not showing very good river details, try the same. Because what I’ve done now was fairly simple. I loaded the heightmap in Photoshop and had the layer at the bottom. I created a new layer where I loaded the image with the extracted rivers. And I did set the blend mode of the river layer to multiply, which basically imprinted the extracted river layer on the heightmap below it. If you want a more technical explanation of what the blending modes do in Photoshop, check Google because going into detail here would expand the article here too much (I know it’s already quite a bit of text). Anyways, I experimented a bit with different blending percentages and saved different files. There was a reason for this because you most likely know that dark colors are the deepest points on a heightmap, and the brightest colors are the higher points. By changing the percentage of the blended river, you can basically control how deep the river will be in 3d if you import the heightmap.
I saved 21 heightmaps until I found a setting that worked well for my map. Another tip I can give is to load all your heightmaps into different layers and find out which one will work best with your river image blended. It might also be worth it to blend different heightmaps into each other but then I would use the “normal” blend mode and change the opacity of the layers because on that way you won’t change the actual brightness of the heightmap. While it might look like I studied the whole subject, I can tell you, I certainly didn’t. I often just experiment and I can suggest you to do the same because that’s how you discover things. It’s fun to play with the blending modes, so I really suggest you do the same and see what kind of effects it has. And there is one more trick! Make use of blur filters, especially the Gaussian blur. Why? If your heightmap is still too rough when imported, you can smooth it with Gaussian blur filters and try to import another experimental file until you are happy. You can apply them on different layers, even on the river layer and see what works best for you. As I said, I saved 21 different versions of heightmaps I created until I was happy. This was my final version (again, the image was much darker but I increased gamma value for this article so that you can see the structure better)…

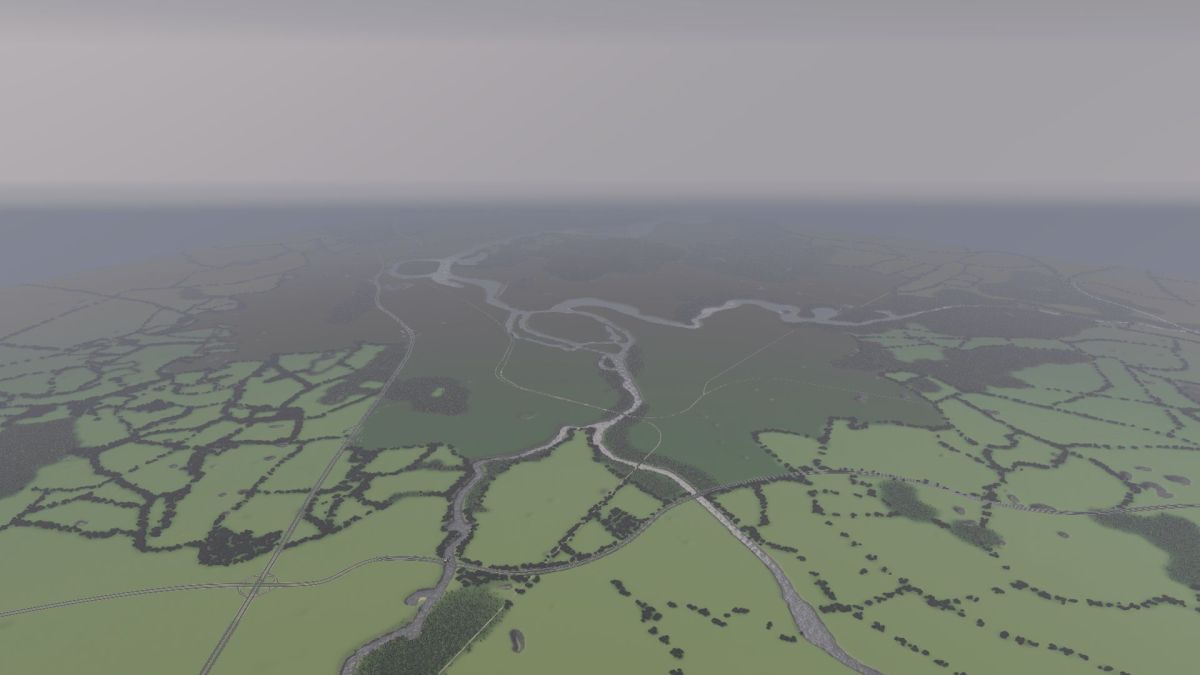
This heightmap worked best for me. The area I am trying to recreate is lowland and all those satellite heightmaps didn’t represent the area well after importing to the game or it was too hard to work with them. But now I had something I could work with. It actually worked that good that I got the idea to do a second map at some point, fictive climate change map as the effect of raising the sea level in the game looked extremely interesting. High tide looked pretty realistic on my map. But for now, I just wanted to recreate the landscape of my city on a normal way. As I said, I was already pretty happy with my final heightmap but I am honest, you can’t get it to 100% perfect. You will have to work on some details in the map editor. So, I made improvements here and there with the Cities Skylines map editor tools. Not much, but you might need to do some smoothing here and there or you might need to deepen rivers. In some areas, my rivers were not connected even if they should be. So, I used the level tool and the soften tool mainly. I was amazed that I even extracted small ponds or lakes when I did the Photoshop work. Ironically I first wondered “What are these craters?” and then I thought “How cool is that? I even extracted ponds and lakes!”. Here is how it looked like after the import…

Now we get back to the question of why I downloaded a massive Open Street Maps file. As I said, there is this cool OverLayer mod. As the name implies, it allows you to show an overlay on top of the map. It makes sense to make the map image transparent in Photoshop, at least to a certain degree. If you don’t do that, you will have a hard time working on the map as you can’t see the things you want to place on the ground, like highways and so. But don’t just save the file, if you use Photoshop, you actually need to export it as PNG file with the “Save for Web” function. If you don’t do that, you might not get the transparency when you load it with the mod. Here is how it looks like if the overlay is enabled in the map editor…


This helps a lot when you want to make adjustments to the terrain if you want to place highways and the railroad network at the original position of your city. You can enable it if needed and hide it if you need a clear view of the map terrain. So, with all those things I previously mentioned, I now had everything I needed to do the map detailing. I wanted to place the railroad network as exact as possible, same for the highways and highway ramps. It also helps you because you can now paint the trees on the forest areas on the map. You probably know that one of the map requirements is to place fertile land so that it can be used later when people play your map. This is fairly easy too with the overlay enabled as you see all those zoned fields on your Open Street View map. And here is another quick tip! Paint small bushes or trees along those zoned fields and after that paint the fertile land within the field zones you painted. This will result in super realistic landscapes, especially if you going after those typical landscapes where there is a lot of farming like in Europe as an example. I can show you an example of how I used trees to create fields. Here is how my current work looks like, see how those fields are zoned…
I hope you got some tricks here about how you can start recreating places on a one-to-one scale in the Cities Skylines map editor. I know, a lot of preparation is happening outside of the game’s editor but it’s super rewarding as it will make map editing or map creation a lot easier once you got all your prepared stuff imported. I hope I was able to inspire you or maybe you found some new methods of preparing and creating maps in Cities Skylines. Here are some screenshots of my (work in progress) map of Lübeck…


And by the way! Of course I will publish this map on the Steam Workshop as soon as I completely finished and tested the map. In that case I will also announce it on my blog!
