There is often the problem that you took tons of photos you want to use anywhere, for example online but the size of all your photos are too big. Also you are sometimes not happy with the names of the photo series as the camera did decide about the filename. You could now either rename and resize every single photo by hand or you let a tool work for you. IrfanView is a pretty nifty little free and fast loading tool I use for these tasks.
In this tutorial I will explain you how batch renaming and batch resizing of your images works if you use IrfanView. The tool can perform these tasks in one go and you have only to tell the software what to do but this is not difficult.
Lets start with the tutorial:
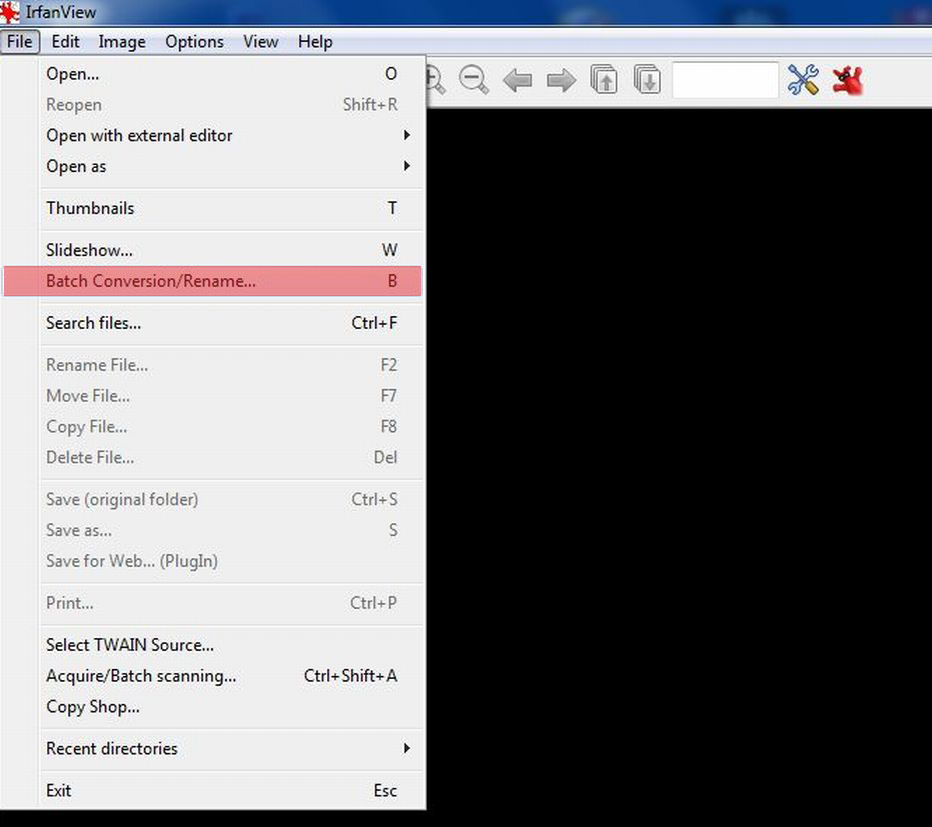
If we started the tool, we either need to press “B” on our keyboard or we navigate to “File -> Batch Conversion/Rename…”

I colored important areas in red and labeled them with numbers, for the simplicity of the tutorial. Let´s start from 1 til 6 now:
1. In this area you should first choose the folder and the images you want to rename and resize. You need to use the control key or shift key for multiple selection.
2. We need to click “Add” now when we have selected some photos. After we done this, the images should appear in the field below the “Add Button” now.
3. Under “Work as” we need to choose “Batch conversion – Rename result files”.
4. In section “Batch rename settings” we can choose a name for our photo series. The tool will rename every file with your chosen name and that numbered. Therefor be sure that you don’t delete the three hash signs. They stand for the numbers in the image name which will be generated by the tool.
5. The section “Output directory for result file” is self-explanatory. You simply can choose in which folder the generated files should be saved on your computer.
6. In the section “Batch conversion settings” We should be sure that “Use advanced options (for bulk resize) is tagged if we want to resize the images as well. We could also change the file format there but “JPG” is already pretty great. For the resizing options, we should now also click on the “Advanced Button” which will bring up a new window…

In the window above we should first proof if “RESIZE” is tagged, otherwise the Tool would not resize all our images. Then we can set the new size as a percentage of the original. Above the percentage settings you could alternative also set a definite resolution if you want. It´s up to you.
Once we made our settings there, we just need to hit “Ok” and we see again the first window.

There is not much more we have to do. We should just proof if all the images we want to rename and resize are in the list on the right. If everything is fine, then we just click on “Start Batch” and the tool will do the rest for you.
Thats all and it will save you tons of work if you have to rename and resize hundreds of photos.
Be sure to check out all the other settings you can make because this little nifty tool can do much more.
For those who use Photoshop all the time, I just can tell you that you anyway should install IrfanView. It´s so fast loading and can do a lot of operations too. I use Adobe products as well but IrfanView counts still to my most used tools for some tasks as it is really a nifty application.

I found this tutorial extremely helpful. thanks a lot!
ronnie
Thanks for your wonderful feedback. I am happy that the article helped. 🙂
Thank you for the tutorial. I am learning Irfanview to expand my knowledge of graphics viewer and image analysis software. Batch function is a good thing to know. Much appreciated.
Your feedback is much appreciated too. Yes batch editing will help to save some time in case we want to edit tons of images. It´s a great function, indeed. I am happy that the tutorial was helpful for you. Greetings 🙂
Guess what I’m gonna be doing now ? 🙂 Good post sir…
What a superb piece of kit… Tried all sorts of things already. As a former mainframe programmer, this is finally a piece of software I’m comfortable with – none of the flashy stuff you dont need.
True. I use IrfanView although I own Photoshop, Bridge and a few other Adobe products that could resize or make changes in bulk as well.
The thing is, Irfan is a fast image viewer, supports lots of file extensions and is theirfor better than any Windows viewer. Small tool, fast loading and as you said comfortable. I like the usability too. And it has some nice features.
If it must go fast, for some tasks as resizing in bulk or adding contrast to any images, I always use Irfan. For simple tasks it´s enough for all other things as complex image editing, I use Adobe products.
Great that you like Irfan too. 🙂
Great guide, and thank you for your work. Does Irfanview not allow you to accomplish the same “rename” feature from a script batch file? Or is that option only avaialble in the GUI?
Hi, thanks Jeremy. Yes you can create either batch files or execute commands in the command console of your OS. It´s little bit complex to write it all down here but it is very well documented in the help section of the IrfanView tool…
Open IrfanView and press F1 or open the help section from the help menu. Under content you find the book entry “Overview”… find the entry “Command Line Options” there. You will find all the informations there about batch file and script commands there.
You need to start each command with “i_view32.exe” and then put your commands behind it. You can also find all available commands in the IrfanView folder in the file called “i_options.txt”. But as said, it is very well documented in the help section of IrfanView too.
Hope this helps you. Thanks for stopping by and your feedback about my article. 🙂
I’m familiar with making those, and that is what I’m referring to. For example when creating multipage tiffs:
call “C:\Program Files (x86)\IrfanView\i_view32.exe” /multitif=(C:\ConvertedMultiTIFF\TestConvert.tif,C:\ConvertedFiles\*.tif) /killmesoftly
*Where TestConvert is, I’d like to be able to use a date and time stamp to avoid files being overwritten, like %dd%%dm%%dy% or something along those lines. Of course my script if far more complex than that, but that is the line that is hanging me up and this big project.
This will have to happen as a task from a task running a batch script. Not from a command prompt. Any suggestions?
I only did work with a script once when I had to convert a massive amount of jpg´s from several folders but added a timestamp too and it looked like (%d%m%Y_%H%M%S).jpg at the end of the output command. Now I am not sure if this will help you but I could imagine that it works similar with your intention but I am not sure…. have you tried something like this in the output command?…
C:\ConvertedFiles\(%d%m%Y_%H%M%S).tif
I believe you need to write the date variables only once as “%d%” and not twice as”%dd%”.
You don´t need to write something like “datemonth” I guess, it´s rather only “%m%” in the case of IrfanView month.
Hope this will help you.
It works in the /convert command but not the /multitif command or /multipdf.. bummer. I wrote another script using Windows NT system functions, and this got me what I needed.
Thanks for chatting and I plan on keeping up with your blogs.
Hmm this is strange but I´m glad you found another way to get the results you want.
I found it extremely NOT helpful and couldn’t use it at all!!!
Maybe you can explain me what you missed? 🙂 Maybe I can help you out.
what do you press after ‘start batch’?
After pressing the button, the program did process the batch editing and you only need to open the folder you did put in “Output directory for result files”. There you will find the images that are edited.
Thanks for the manual.
One question I run into: I have a lot of pictures, all 200dpi, but of different sizes in cm. I want to batch convert them to 110dpi, but keep the sizes in cm unchanged… I could not find the settings to do that. Any clue? thanks!
Hi Martin, thanks for your feedback about my tutorial.
About your question… I believe you just have to open the advanced menu in the batch converter window, there is an entry called “Set new DPI value”. As you don’t want to have the aspect ratio or resolution changed, be sure that the resize field is not checked or marked. Let me know if this helped you. I never converted DPI and I am interested if this works, but I guess it should.
If there just “Set new DPI value” is set, the DPI gets as requested, the size in cm gets BIGGER and the file stays the same.
What I would want is DPI lower, cm exactly the same, file-size smaller.
That is possible with one individual file, where you would choose:
“Set new DPI value” and
“Resize” and “Set Width to” = original size.
But when doing batch, that would lead to all pictures having the same cm size.
About setting width to original size…. I see there is an entry “Set new size as percentage of original” in the batch window. Try to mark this and type 100% in the width and height field. I think this would mean the files will be stored individually in original size as 100% is the original size. Then set also the lower DPI value below. For decreased file size you could also click on the option button beside the fileformat or output format… there are further settings like “save quality” and so on.
I hope this will make your task possible. But I think if you set resizing to 100% for both width and height, it should remain original size. Can you try this? Does this still resize all all images to the same size? Let me know.
Ah, that is a good one, would expect that to work but alas! It gives the same result: dpi is adjusted, but cm-size gets bigger and file-size stays about the same.
With this “Set new size as percentage of original” I also tried “Resize based only on new/old DPI value” but that makes no difference in dpi or size.
I think you are not alone with this problem. As I didn’t have any more ideas now too, I asked Google and found this old IrfanView forum thread about the exact same problem:
https://irfanview-forum.de/showthread.php?t=2021
It seems there really is no feature that would make you task possible but users there requested that a long time ago. The thread has entries from 2008 and the last one from 2009… as we both tried everything now, I assume they didn’t add this featue 😦
Even if the thread is old, if I were you, I would probably push this thread up with a request to add this feature… who knows, the more people want this feature, the higher the chance that the developer will add it?
For now, someone posted a work around there…. it’s tricky but better than changing hundreds of photos by hand. Someone there wrote:
“Use the thumbnail view to sort the folder by image width, then start batch operations with selected files. Then you can set the image width in inches while changing the dpi. You may have to do several batch operations, but at least you won’t have to do the images one at a time.”
Not sure if I completely understand this… 😀 Still sounds tricky… sad that there is no feature that would make it easier.
1. Thanks a lot for your thoughts! What you say is true and apparently this is not possible (at least I know I am not mad 😉
2. The link to the irfanview forum is indeed exacly what it’s about. I cannot register for the forum though, “registering is closed”. If you have a log-in, I would be grateful if you make a new post on this topic.
3. The workaround that you quote is very good though! Sort on cm-size, and for each size, do a separate batch resize. Not ideal, but it will work.
Thanks again!
Martin
1. You are welcome 🙂
2. You are right, I see no register button either. Maybe they closed it… don’t even know if it’s the official forum. I never had an account there, just found it via Google.
3. Yes, doesn’t sound ideal but at least better than single conversions.
Aha, the last post (#10) in the irfanview forum sent me to a solution. In my case, the pictures have different cm-sizes, but all have the same DPI. What works is:
— calculate % change in DPI, e.g. I have 200, I want 110 = 55%
— in Batch conversion / Advanced set:
— check Resize:
— Set new size as percentage of original: 55% / 55%
— Resize based only on new/old DPI value
— Set new DPI value 110
Now I get 110dpi, with the ORIGINAL cm-size. That is what I wanted!
Yay! Awesome! Good that you have a solution now! I didn’t work that much with DPI yet as I rarely print things… I do only bulk resize images per pixel or aspect ratio often, as I do need images only for my blog. Anyway, in case I need to do something similar to your task in the future, I can find your comment and try this solution 🙂 Great that it works for you now, even if a single button for that in the tool would be much more handy I guess.
Thank you for taking the time to write this up, it is very helpful.
Thanks for the feedback, I am glad that the guide was useful for you. 🙂