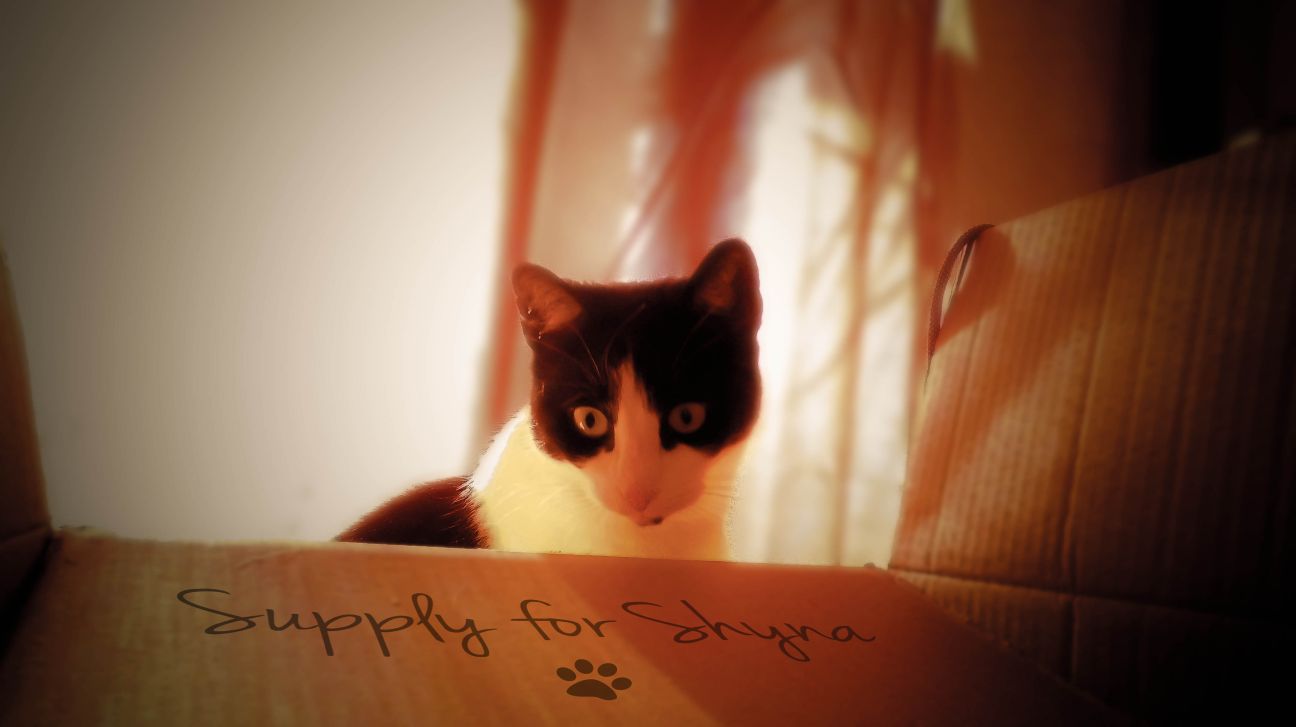
If you have Adobe Photoshop and Adobe Lightroom, I highly suggest that you don´t delete any photo just because it looks bad. Often you can really make something out of it. This article here is basically written to make some notes for myself but also for people who are into Photoshop and Lightroom and want to read about possible techniques or who want to get inspired by my workflow. For all others it might not be easy to read. The image above is the result after working on the very bad quality original image that I took of my cat before. In the case of my bad original photo that I will show you after this paragraph, it was clear that I wouldn´t be able to make a high quality and super sharp image out of it but I think this is not mandatory. Another solution was to give the photo a comic style look or an artistic look. I think it does not always have to be a very realistic sharp looking image, especially not if it isn´t possible due to the bad quality anyway. So, let me show you the original bad snapshot that most people would probably delete as fast as possible:
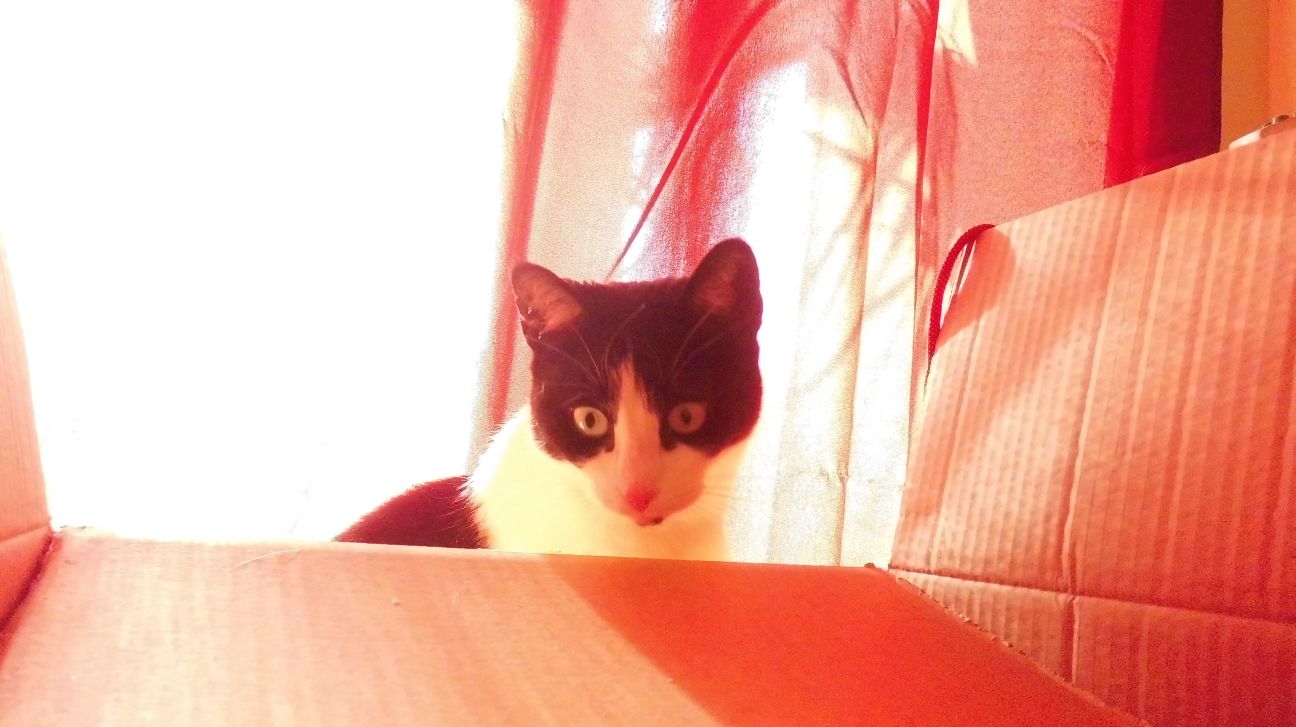
The first thing that you will probably notice is that the left side of the background is highly overexposed. But also parts of the curtain are overexposure and not only this, some parts of the fabric are also very grainy and I really didn´t like that. For me , both things were obviously something I wanted to fix. But the whole colour levels of the image were not ok so that I decided to start with some general corrections first.
In those situation, you have a lot of possibilities with both Lightroom and Photoshop. I opened my bad original image first with Lightroom because it has some great options that are sorted very well and the accessibility is quite cool which is why I prefer Lightroom over Photoshop, at least for basic adjustments.
I started off and decreased the exposure of the image a little bit and it removed a lot of the annoying and glaring background lights. But I just decreased the exposure very little because I wanted to make all other tweaks with the level adjustments. This means I also decreased the lights and whites in the tone curve and also darkened the shadows and the dark colours. I then adjusted the curve a little bit and was quite happy about the fact that the dark colours did now pop out more and the lights less. This is how I fixed a lot of the exposure.
But some of the lights were still blending into the curtains and the grainy parts of the curtains that I mentioned, did still bug me too. One way to fix this came to my mind, it´s a Gaussian blur effect. This is an effect that blurs the image but I didn´t want to blur the whole image. I wanted to blur the remaining exposure in the background and the too sharp and grainy curtain. This is a little bit more complex and I had to use Photoshop then. I basically did select the whole background but not the cat and also not the box. I made a separate layer with the background so that I was able to make changes only there. I added a quite heavy Gaussian blur effect and adjusted it further. Then I selected the box and made a separate layer out of it and added Gaussian blur as well but there just a tiny amount. The cat is the focus and should not be blurred, which is why I did leave her out.
Another idea came to my mind. I saw that there was much room on the box to write something on it. To add a text three-dimensional correct on an object, there is a tool called Vanishing Point in Photoshop. You can trace parts of the image with a three-dimensional grid and it will allow you to place decals or text objects correctly on it. When I have done this, I just had to copy my text object over it and it looked like it would really be inscribed on the box. To make it appear a little more faded and real, it´s highly suggested to set the blend mode of the text layer to “Hard Light” and after that it is often a good idea to decrease the “Opacity” of the layer. It looked fine to me and I saved the image again but this time in Photoshop.
I loaded the recently saved photo with Lightroom again and started to fine tune other things. I adjusted and removed some clarity to add a little more blur but just very little. Several colours where still aggressive which is why I also decreased the vibrance value and just a little of the saturation. I played with the noise reduction value and added back a little sharpening just to find out what of both I like better. Then I changed the temperature of the image and it now looked quite cool because I changed the temperature more to orange and the image appeared more soft in this colour and not so aggressive like before with bright red or orange. Finally I added a lens vignette effect and also midpoint vignette, which is the transition into black around the corners that puts my cat more into focus. A good side effect of the vignetting was that the outer bright areas became yet again darker. All this together transformed a formerly very bad image to a quite interesting image with a little comic or painted style. You saw the first image of this article and that is the improved one while the second is the bad one, but I guess this is obvious.
So the point is, if you really want to rescue an image, there are often possibilities. We often try to get the image sharp and realistic but doing the opposite is something that you can consider too, and in my opinion a comic look or a painted look can be very beautiful too. I´d suggest to grab some bad images from your photo arsenal and load it either with Lightroom or Photoshop or work with both. Images are never the same and there is often not one solution for all images but it doesn´t matter because you can still mess around often enough with any image and it won´t hurt. I do it the same way. To be honest, sometimes I don´t even know what I do, I just mess with the images and settings until I am happy, and if not, I just load another image and start from scratch. This is how you can learn and how you can get an eye for things. If you read or watch tutorials in addition, then you will really be able to come up with some great ideas.
And as said, you will be surprised what you can make out of a very bad image.
Hope this article inspired you a little bit to stop deleting bad images, I hope it inspired you to try things out.

I actually never delete a photo once uploaded on the computer. I think it goes back to when I started with film, I would go back through my negatives and try and print bad shots to learn certain techniques. Another reason is a photo you think now looks bad may in a few weeks time be better than the one you finally choose, but of course I also go by the rule that you can’t polish a turd.
I pretty much agree with all you said. I also don´t delete that much because I do think that I could either use them later on or improve the images when I am bored. Doing this with very bad images, helps indeed to learn certain techniques but you are right, some images might be so bad shots that it is not worth to spend time on them, which would be the only case when I would delete the file.
But I hope that trying to improve images of my point and shoot camera, will be a useful skill later on when I bought my first SLR. I think 50% of my bad images are my fault while the other half of the bad images are simply bad because of technical limits of my point and shoot, like schutter speed, bad focus and clarity of the images, ISO graininess and so. But fixing it digitally, while probably help later on when there are less technical limits and when I learned more about photography too.
Thanks for your opinion. 🙂
you are right – that is now a great shot of Shyna –
Thank you. It looks a little bit dreamy or artificial but I like that style and also it was the best way to make something out of the bad original. I´m glad you liked it 🙂