Have you ever asked how the most commonly used meme font is called? I can give you the answer. The font is called Impact. Impact is included in the “core fonts for the web” package and has been distributed with Microsoft Windows since Windows 98, which means you should have the font already installed if you use this any Microsoft operating system. The very thick strokes of the Impact font are aimed, as the name suggests, to “impact” or in other words to stand out. The Impact font is commonly used for funny Internet memes like the Lolcat images.
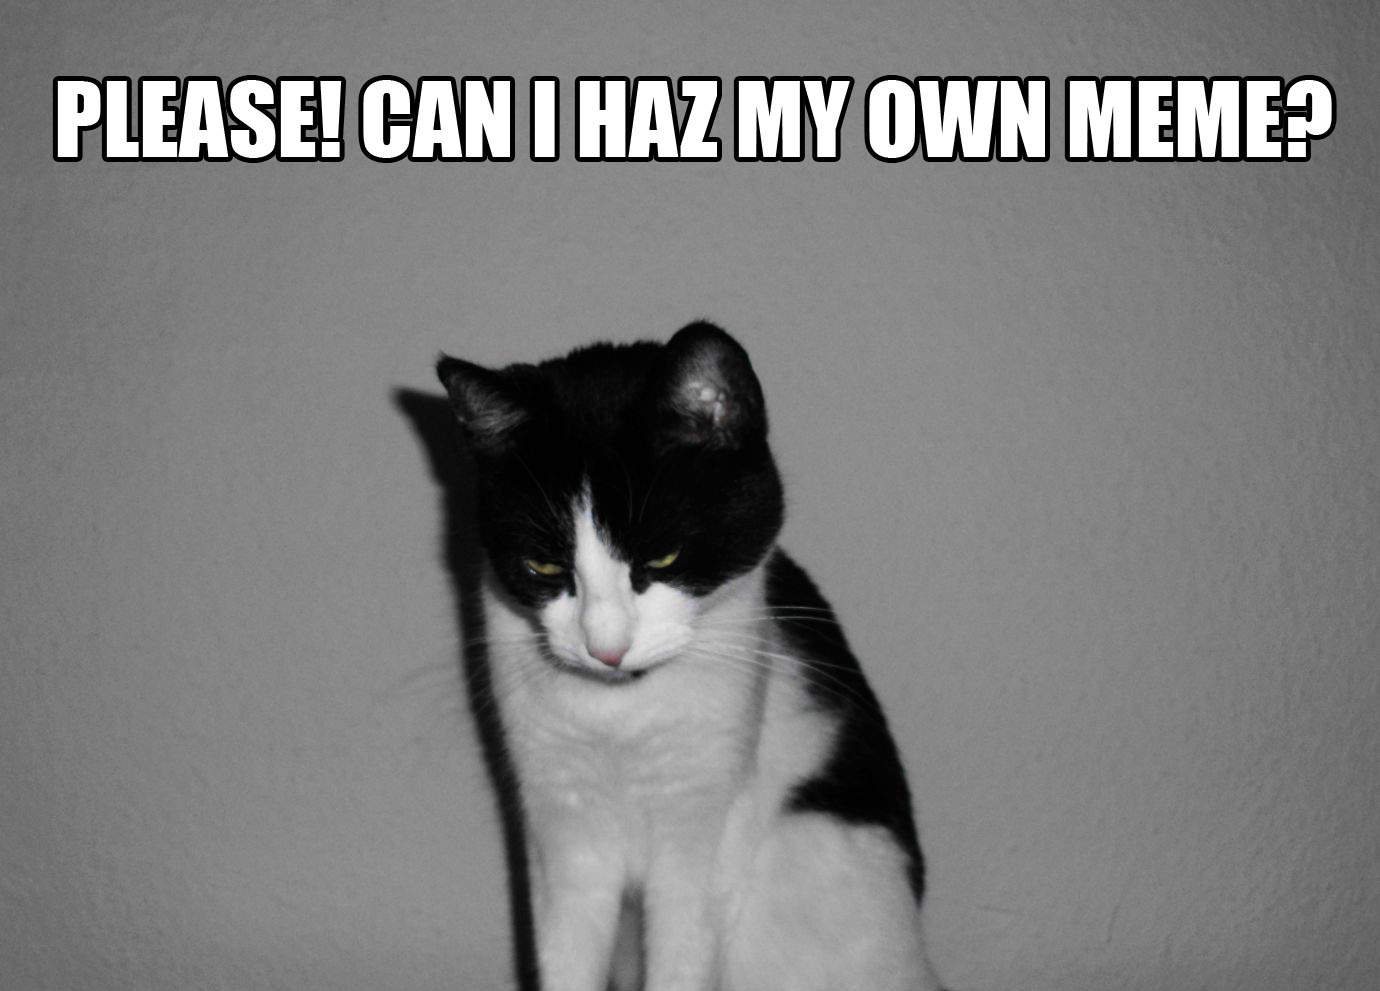
If you want to create similar memes, you can use the Impact font to add a caption to your images, you could also use other fonts but Impact is the most used font for memes as said. The messages on memes are very often completely written in white capital letters and there is often a stroke effect or let me say a small black border added around the text. In this tutorial you will learn how to create memes with Photoshop. I will use a photo of my cat Shyna to explain how you can do it…
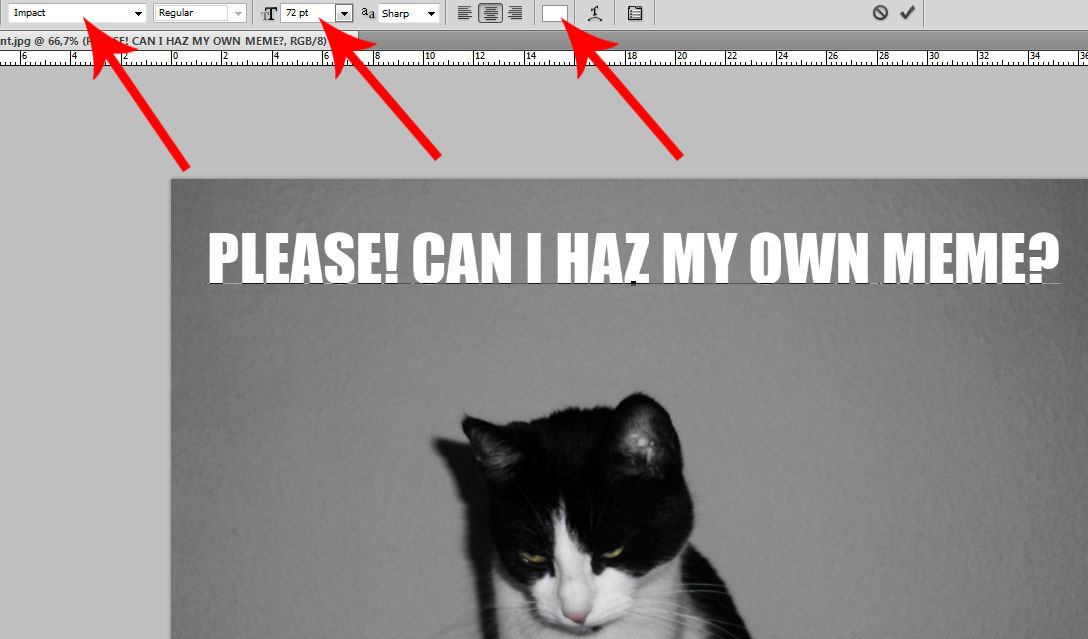
First we should open the image in Photoshop. Here is how we put a caption on the photo. We can either press “T” on our keyboard which would activate our “Horizontal Type Tool” and then we just have to click on our image to place the text or we just click on the “Type Tool Symbol” in Photoshop and click on our photo to place a text…

If we have done this, then we just need to choose the Impact font and we should be sure that the text color is white. Also we can already change the font size if we like. After we have done the settings, we start to type in the caption we want to use. Most memes are completely written in capitals if we want to do it the same way…
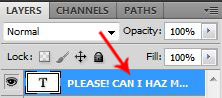 But we now need this black border around the text like in all the other funny memes of the internet. We have to right-click on our new text layer and a menu pops up where we choose and click on “Blending Options…”.
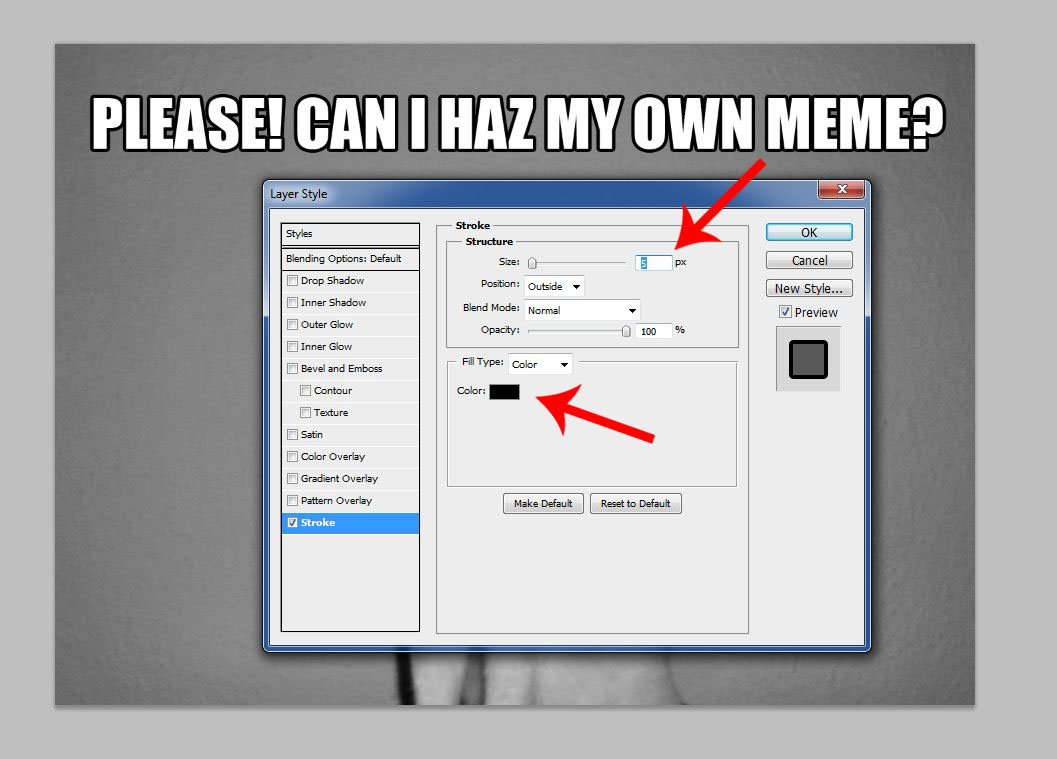
In the opened Layer Style Window, we just activate and click on “Stroke”. This will paint the mentioned commonly used black borders around our text. I think it is always standard on black but we can proof this in the settings windows there. What we also could do is controlling the thickness of the border around the text. I think it is standard on 3 pixels and for my taste not enough. I change the value sometimes to 5 pixels. But this is just a matter of taste. Once we did the settings here, we can press ok…
What we now still could do is moving our text. Just click on the text layer again and move the text until you feel it fits in the image. Some meme photos do even have black borders, I wrote also a guide how to add black borders to your images, in case this is interesting for you too.
That is all. Hope this small guide is a help for those who want to create their own memes with Photoshop too. 🙂
If you like to read more about internet memes, do also check out my article why internet memes are so popular, or read more about Impact the most popular meme font. If you want to create memes in no time, check out the list of online meme generators.
Related Categories:
– Photoshop Tutorials
– All Graphic Design Tutorials
– Memes You Can Find On This Blog

Good tutorial! I was looking for this
Thank you for your friendly feedback 🙂 Great to hear that you found the guide to be useful.
Thank you, I couldn’t figure out what font it was for the life of me.
Happy that you know the font name now 🙂 Hope you create plenty of funny memes now 🙂
Thanks. this helped me out a lot
Thank you for the feedback.
Awesome! I want to go make a MEME right now 😀
Cool! Hope you come up with some funny meme ideas 🙂
Nicee! but then how about the meme with a picture and black frame with white text below.?
Do you mean that you want to add a black frame around the image? There are several ways to do it. It is just a question how much room you have on your image to do so, without hiding the important photo elements.
If your image does still have enough room to offer on the outsides to replace it with a black border, then I would do it this way….
1. Load your image in photoshop and duplicate the layer of the image (menu / layer / duplicate layer). This is something you should always do to have the main image untouched, incase you would like to restart editing.
2. Then you can select your new layer, I mean the new copy of the image. Then adding strokes would be one idea (menu / edit / stroke). In the stroke menu you have to choose “inside”. Then you can still choose how much pixels you want the frame to expand inside of the image and you can choose a colour, for example black.
3. The border should be already there if you did that. However, it is a good idea to use the magic wand tool of photoshop and use it to click on your newly created borders. This method will select only the borders you created. If you did that, then you can inverse the selection (menu / select / inverse). If you did that, then you just hit your delete key on the keyboard to get rid of everything but not the frame. Point 3 here is optional but I suggest it as you then have one layer with the black frame only and behind is the layer with the main image. It is just for the purpose of better editing as you now can edit both image and border separate. 😉
If you do not have enough room for borders inside the image, then there would be another way. You could also expand the image so that there is new created room for borders around the image. This would work on this way…
1. Select your layer and expand your image with (menu / image / canvas size). In the canvas size menu, click on “relative” and then type in your width and and height (in pixel) for the border and choose pixel beside both values. Make sure that you also choose your colour for the border in the same menu.
2. Again optional but you can also here try to seperate the newly created borders and the main image. The techniques are little bit similar like in point 2 of my first method.
There are even some other methods to create borders. But depending on what kind of image you have and how much room there is on the outsides for borders, the two methods above should help you out.
Adding text on the border is as simple as in the tutorial article here descriped.
Let me know if I did understand your question wrong or if you still have any questions to add. 🙂
EDIT : I wrote a Photoshop tutorial afterwards where you can learn how to add black borders to images: https://diaryofdennis.com/2014/04/08/how-to-add-borders-to-photos-with-photoshop/
I thought they were asking which font is used in the memes that just have a picture with a black background and white text. It’s definitely not Impact, and I’m having a really difficult time trying to figure out what it is.
In case you have a link with an example image, I would be interested to help you out finding the font name. Another way would be that you try it on your own. You might be interested in an article I wrote. There are ways to find the names of fonts that are used on an image: https://diaryofdennis.com/2014/02/03/how-to-identify-different-fonts-and-the-font-names-with-a-font-finder-tool/ I hope this helps you. 🙂
Thank you, that article was very helpful! I eventually found it on my own, by trying out every font I had, and discovered the ‘Century’ was a perfect match (thankfully it started with a ‘C’, that could have taken a while). I would have posted an image if these comments allowed that. For an example of what I mean, here is one http://2.bp.blogspot.com/_rStNisZvyww/S9KyiQa85vI/AAAAAAAAAJ4/6qnzJ5lPfOE/s320/star-wars-darth-vader-sense.jpg
Century looks indeed very similar. But Goudy Old Style looks also very similar: http://www.myfonts.com/fonts/dtptypes/goudy-old-style-dt/regular/
I wrote a Photoshop tutorial about this, in case someone else wants to learn how to add black borders to images: https://diaryofdennis.com/2014/04/08/how-to-add-borders-to-photos-with-photoshop/
You’re rad. Thanks for the simple explanation!
Thanks. Your comment is bombastic. Hope you have a lot of fun while creating several super awesome and funny memes 🙂
This is much more fun compared to all the meme creator or meme generator tools. Photoshop gives much more fredom in creativity. I really dislike meme templates. With help of your tutorial I am now able to create my own memes. Thanks for the tutorial!
I do agree. Photoshop does not limit you like any meme creator or meme generator website. “Fredom of creativity” really fits as a saying. Thanks for your opinion.
Easy and very handy! Thanks for this one bro!
Great that it was helpful for you 🙂 Thanks for the comment. 🙂
Im confused, how do you create the black border around the text? Idk what this “new text Layer” for one, is supposed to be.
I have added another screenshot. Go back to the part with “new text Layer” in my tutorial here. On the screenshot you can see how this text layer or object looks like. Layers are usually in the so called “docked panels” in photoshop. It´s the panel on the bottom right.
That´s the panel where you usually can see your created objects which are called “layers” in photoshop. 🙂
When you found it, you will need to right click on your text object in this “docked panels browser”… the right click on the text layer will open a list where you choose “blending options”… how you need to go on is explained in the tutorial.
Let me know if you have still questions. I´ll help you out.
In other words… if you did use the same text as I did… you simply right click on the “Please! Can I haz my own meme?” text on the bottom right small panel or window in Photoshop. 🙂
Ty for the help and feedback man!
Thanks for the quick tutorial. It was right to the point, minimal nonsense.
Thank you for giving feedback. Happy to know that you liked the guide. Hope it helps you to get creative with your ideas.
actually to minimize time, you can do this:
1. Choose your picture.
2. Open Micosoft PowerPoint.
3. Insert chosen picture. (in insert menu)
4. Adjust to size.
5. Insert WordArt. (in insert menu)
6. Choose WordArt with white-ish fill and dark blue outline. (The first one in the top left.)
7. Type text.
8. Highlight text.
9. Right-click WordArt text.
10. Change font to impact.
11. Go back to the WordArt menu. (Make sure you the latest you clicked is the WordArt text to see the menu. It is seen in the “top shelf” of the window. Options are in between right and middle.)
12. click “Text Fill” and choose white.
13. Click “Text Outline” and choose black.
14. Click “Text Outline” again and click “Weight”. Choose 2 1/4 width.
15. Adjust your text position in the image by clicking the text, click and hold the broken lines in the sides, and dragging it to place.
16. Press “Print Screen” in your keyboard.
17. Open Paint.
18. Paste (Ctrl + V) it in the Paint window.
19. Crop the picture. (Use your common sense on where to crop.)
20. Save it.
Congratulations!!! You just created a meme! Trust me. Though I’m only 15, I assure you it has better results and is hassle-free since MS Paint and MS PowerPoint is a default program of Windows. (Unless you’re using Mac or others, don’t know about those wiz-whats.)
Once done with Photoshop, you will be able to create a meme in just a minute like in every other program too. I can´t see that you minimize time. And “better results” is completely subjective. Since Photoshop does allow much more than adding text, a heavily tweaked image in Photoshop will be much more visual appealing in my opinion.
My article was aimed to Photoshop users. You can use many programs to create memes. It works with dozen of other free tools too (Gimp for example). If you want to do a little bit more than adding just text to an image (tweaking and edit the image or add things), then MS PowerPoint won´t help you out that much like Photoshop.
And by the way. PowerPoint is not a default program of Windows (I dont have it on board of Windows 7 professional). But right, MS Paint is a default program of Windows.
Other than that, you made a nice addition to my article, in case someone does not have Photoshop. It might be helpful for those who want to do it with PowerPoint (well, in case they have PowerPoint). Thank you for the addition.
Thanks man! Very helpful 🙂
Thank you for your nice feedback. Hope you come up with some great meme ideas. 🙂
Awesome, now I don’t have to use online meme generators! Thanks man!!
True, and it is much more fun to make your own meme with Photoshop. Hope you will come up with some funny memes. 🙂
Very easy, straight to the point.
Thank you.
awesome, really helping and supportive (Y)
Glad you found this meme guide helpful.
Thanks a lot! Very helpfull!
Thanks for your feedback. I am happy that it was helpful for you. Now go create some funny memes and make people laugh 🙂
in photoshop i can only find impact regular even when i search, help please?
I used Impact Regular too as you can see in the one screenshot where I pointed to the font. This is the commonly used meme text font style. 🙂 You might have a different version of Photoshop but I am not sure. In my case it shows the font style option in a different box than the font name. Maybe iyour Photoshop shows you Impact Regular in one box? I don´t know… anyway, it´s the font used in memes. 🙂
Thanks man! I’m about to create the world’s best meme xD
There are never enough memes in the interwebs 🙂 I’m glad you will start to create your own memes now too 🙂
Thank you so much, great tutorial.
I am glad the meme tutorial was helpful for you 🙂
Wow, a great find. Easy, understandable and a great tutorial. thank you i really need this because my professor assigned our class for a meme project, thank very much dear sir.
Looks like you have a cool professor because this project sounds like fun! 🙂 It makes me happy to hear that the meme tutorial was helpful for you 🙂
Very useful tips! Thanks Dennis!
I am glad you liked it Moon 🙂
can you please tell how to load an image on photoshop 7.0
That is a very basic question 🙂 You open it like with any other image software… right click on the image in windows and choose “Open with…” and the program you want to use, in this case PS 7.0.
Another way would be to open it through the menus in Photoshop. See the “Files” menu and click on “Open…” and choose the file you want to open. 🙂
Thank you for letting me know which font to use. I made a meme in a few seconds flat. Good job!
Hi Jon. I am glad I could help with the article. 🙂 Thanks for your feedback.
Thank you for your generosity and work!
I am glad you liked my article about memes 🙂
Thanks excellent way in explanation 🙂
I am glad you thought the article was helpful 🙂
This was very useful. Thank you. It helped a lot.
This is a very well-written article.
Thank you, I am glad you liked the article.
The font most people use is not impact for memes, but its Helvecita Black Condensed. Just a quick note!
You’re awesome. Thank you SO much! This made my life much easier to have all the settings so nicely spelled out.
Good to know that the guide helps people. I am glad that you liked the article 🙂
Hah, get ready for my own memes. Now I have skills. 😀
YaY! Cool! 🙂 Good that I could help you to learn something new! 🙂
So easy when you know the right font! 🙂 Using the ‘Stroke’ for this effect is quite cool; I tended to use a different technique for the borders, but yours is far better and way easier to do! Thanks very much!
All roads lead to rome. That’s the fun part about playing with graphics, there are many ways to do things, or to try different techniques 🙂 But I am glad you liked my technique and guide. 🙂
As a fan of lolcatz and icanhascheezburger since day 1 (and the fan gear to prove it – bukkit). So finding your blog post here is MAGNIFICENT! Love making original memes and now they can be more recognizable with the official font. 🙂 Thanks Dennis!! A debt of gratitude will be repaid through many memes!
Hehe, that’s cool! I am glad this was useful for you. The more memes in the web, the better 🙂