Introduction
In this tutorial you will learn how to create a config file for Counter Strike Global Offensive. The file is also commonly known as the “autoexec.cfg” file and it’s the place where you can store your individual settings. You can store and enable or disable certain console commands with the file. This is especially helpful if you want to activate or deactivate certain features or console commands permanently and for a long time. If that’s not the case and you only want to use a special console command once and for the time the game is running, learn how to open and use the console in CSGO instead. Both ways are perfect to customize your Counter Strike experience.
In this guide you will not learn what kind of commands you should use, because this depends on your intention and templates just won’t make you happy. Valve is hosting a full list that contains every single Global Offensive console command, check it out to understand what kind of console commands you can use. But now we fill learn how to create the “autoexec.cfg” and where to place the file for future use.
How To Create A Config File For CSGO
- Open a text editor like the Notepad program in Windows.
- Even if the text file is still empty we do now save it by clicking on “File” and choose “Save As” in the menu.
- Name the file “autoexec.cfg” without quotation marks of course, and under “Save as type” you need to select “All Files”.
- Save the file, it’s ok if you do save the file on your desktop for now.
- As we have it on the desktop now, we can now easily access it to work on our config, to fill the file with the commands and settings we want to use.
- If we are happy with the file, we can now copy it to the “cfg” folder in CSGO where it belongs, it’s in the directory “…\Program Files (x86)\Steam\steamapps\common\Counter-Strike Global Offensive\csgo\cfg”.
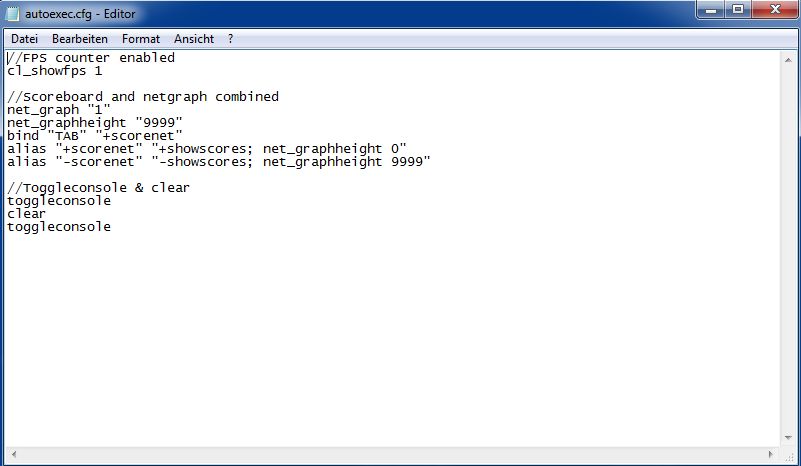
- If we want to add or remove things in the future, we just have to open the same folder and edit the “autoexec.cfg” again. Below is an example how my “autoexec.cfg” looks like…
Troubleshooting
If you did everything step by step it should work perfectly, but sometimes it’s not working right away, but in this case we can try some things:
- Make sure that the file is really called “autoexec.cfg”, it should not be called “autoexec.cfg.txt” because that wouldn’t work.
- Check if the file is really stored in “…\Program Files (x86)\Steam\steamapps\common\Counter-Strike Global Offensive\csgo\cfg”.
- Make sure the file attribute is not set to “read-only”.
- If everything looks right, but the game is still not reading from the “autoexec.cfg” file, try to add “+exec autoexec” to the game launch options in Steam. To do this, open Steam and find your installed CSGO in your library. Right-click on it and click on “properties” in the menu. Under “General” click on “Set launch options…” and paste “+exec autoexec” without quotation marks of course and launch the game.
- Optional, try to force the loading of the “autoexec.cfg” file by opening the console in the game and use the command “exec autoexec”.
Last Words
I hope this article was helpful and you learned how to create a config file called “”autoexec.cfg” for Counter Strike Global Offensive. If you want to add valuable information’s, or if you just want to talk about something related, check the comment section below the article and drop some words. Have fun in Global Offensive!

3 thoughts on “How To Create A Config File For Counter Strike Global Offensive”